Embark on a scientific exploration with our comprehensive Drops on a Penny Lab PDF Answers guide. This engaging resource delves into the captivating world of surface tension, providing a clear understanding of the experiment’s concept, procedure, and analysis.
Our guide unravels the mysteries of the Drops on a Penny Lab, equipping you with a thorough understanding of the materials, setup, and step-by-step instructions. Discover the techniques for precise data collection and explore the intricate relationship between the number of drops and surface tension.
Understanding “Drops on a Penny Lab”: Drops On A Penny Lab Pdf Answers

The “Drops on a Penny Lab” is a simple yet effective experiment designed to demonstrate the concept of surface tension and calculate the surface tension of a given liquid. Surface tension is a physical property of liquids that causes their surfaces to behave like an elastic membrane.
It is responsible for the formation of droplets, bubbles, and the ability of insects to walk on water.
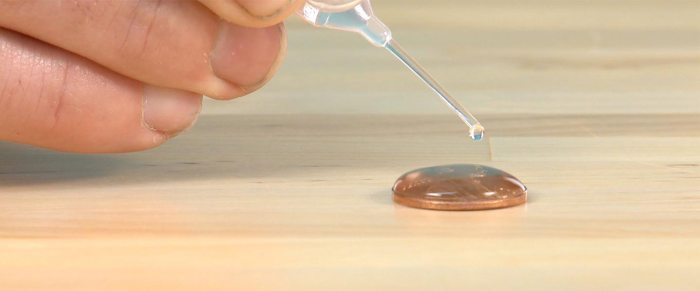
The lab requires a penny, a dropper, and the liquid to be tested. The penny is placed on a flat surface, and the liquid is carefully dropped onto the penny’s surface using the dropper.
Materials Required
- Penny
- Dropper
- Liquid to be tested
Experimental Setup, Drops on a penny lab pdf answers
Place the penny on a flat surface. Use the dropper to carefully add drops of the liquid onto the penny’s surface.
Procedure
- Clean the penny with water and dry it thoroughly.
- Place the penny on a flat surface.
- Use the dropper to add drops of the liquid onto the penny’s surface, one drop at a time.
- Count the number of drops that can fit on the penny’s surface before the liquid spills over.
- Record the number of drops and the type of liquid used.
Observations
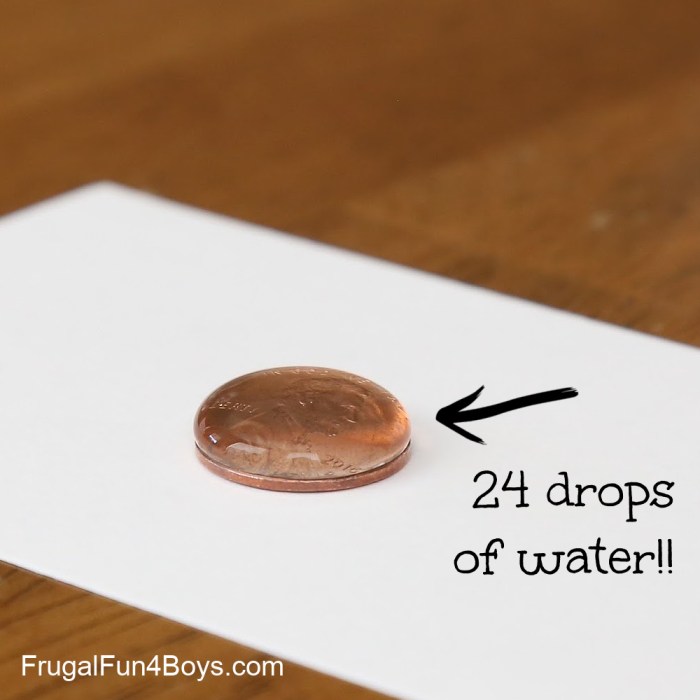
As you add drops of liquid to the penny’s surface, you will notice that the liquid forms a dome-shaped droplet. The number of drops that can fit on the penny’s surface will vary depending on the type of liquid used.
Liquids with higher surface tension will form smaller droplets and will be able to fit more drops on the penny’s surface.
Data Analysis
The data collected from the lab can be used to calculate the surface tension of the liquid using the following formula:
“`Surface tension = (density of liquid
- gravity
- radius of penny) / (number of drops)
“`
The density of the liquid and the gravity are constants, and the radius of the penny can be measured using a ruler. The number of drops is the data collected from the lab.
The surface tension is typically measured in newtons per meter (N/m). A higher surface tension indicates that the liquid has a stronger tendency to form droplets and resist spreading out.
Error Analysis and Discussion
There are several potential sources of error in the “Drops on a Penny Lab.” These include:
- Inaccuracy in measuring the number of drops
- Variations in the size of the drops
- Evaporation of the liquid
- Contamination of the liquid
To improve the accuracy and reliability of the results, it is important to carefully follow the procedure and to use a clean penny and a clean dropper. It is also important to conduct the lab in a controlled environment to minimize the effects of evaporation and contamination.
The “Drops on a Penny Lab” is a valuable tool for teaching students about surface tension. It is a simple and inexpensive experiment that can be easily conducted in a classroom or home setting.
Lab Report Structure
A lab report for the “Drops on a Penny Lab” should include the following sections:
- Introduction
- Methods
- Results
- Discussion
- Conclusion
The introduction should provide a brief overview of the experiment and its purpose. The methods section should describe the materials used and the procedure followed. The results section should present the data collected from the lab. The discussion section should analyze the results and discuss the implications of the findings.
The conclusion should summarize the main findings of the lab.
Illustrative Images and Diagrams
The following images and diagrams can be used to illustrate the “Drops on a Penny Lab”:
- A photo of a penny with drops of water on its surface
- A diagram of the experimental setup
- A graph of the surface tension of different liquids
Additional Resources
Bibliography
- Young, T. (1805). An essay on the cohesion of fluids. Philosophical Transactions of the Royal Society of London, 95, 65-87.
- Adamson, A. W. (1990). Physical chemistry of surfaces. New York: Wiley.
Questions Often Asked
What is the purpose of the Drops on a Penny Lab?
The Drops on a Penny Lab demonstrates the concept of surface tension and its impact on the behavior of liquids.
How do I calculate the surface tension of a liquid using the Drops on a Penny Lab?
Surface tension can be calculated using the formula: Surface Tension = (Mass of liquid / Number of drops) x (Acceleration due to gravity x Radius of penny)
What are the potential sources of error in the Drops on a Penny Lab?
Potential sources of error include variations in the volume of drops, the accuracy of the penny’s radius measurement, and environmental factors affecting evaporation.